¶ Record or Import Sound and Music
How about creating your own sound effects? You can either record or upload your own sounds to HypeHype!
- Navigate to My Assets in the editor bottom bar
- Tap Record Audio to open the record and import menu
- To record:
- just press the red button!
- You may need to give HypeHype the permission to use your device's microphone at this point
- Trim the audio after recording
- Tap Play to hear the sound
- Tap Save
- Double-check you're not using any copyrighted material!
- Name the sound
- Tap confirm
- Add the name, again, and description as hashtags
- To import sounds:
- Tap Open File
- Follow the instructions
- Supported audio formats: .mp3 for music, .wav for sound effects
¶ Import Skyboxes
A Skybox is a background image that surrounds your entire game scene — like a distant scenery. There are different skyboxes in the Asset library, but you can also import your own images. Supported file formats are hdr, png, jpg/jpeg and dds
A good skybox image has the ratio 2:1 and its left and right side blend properly to create a seamless background no matter where you look in the scene.

¶ Upload 3D Models
You can even import 3D models to HypeHype!
To upload and publish your own 3D models, you need to use the desktop version of the HypeHype application.
Once in desktop, navigate to the Editor Bottom Bar → My Assets → select Upload Asset
The supported file format is .fbx
¶ Create 3D Models with External Software
This section guides you through the process of creating and uploading your original 3D assets for HypeHype!
Credits for uploaded models will be given to the original creator, and if possible, the creator’s HypeHype account will be linked to the asset.
Creating the asset from scratch will follow these steps! Don’t let the document’s length or terminology throw you off guard - the steps are simple, and once you go through them a few times, you’ll be able to gain significant speed in asset creation!
Currently we support and encourage creating simple, basic objects - meaning that animations and rigged characters need to be left out from the process, for now.
Download the example asset here
(file is in .blend format)
¶ Software
We strongly recommend you to create your own HypeHype models with Blender. It is a free lightweight desktop 3D editor, and based on our experience, you're likely to encounter less problems with the finished assets if you use Blender.
Download Blender
¶ Art Style
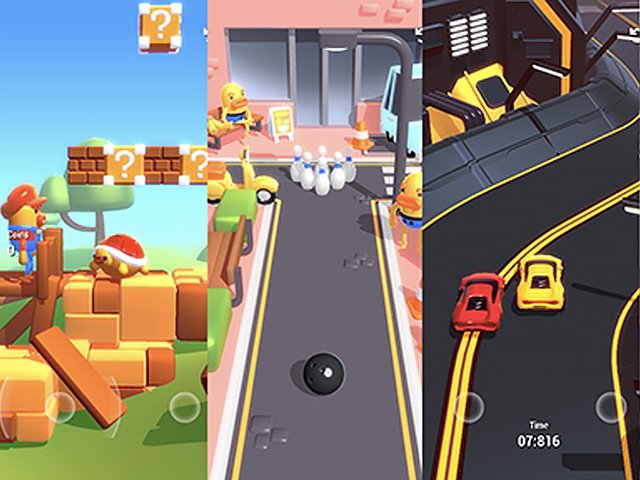
HypeHype as a creation platform allows creators to use any kind of art style available. We offer 3D assets in various art styles and will continue expanding the selection of styles in the future.
Currently, the generic art style execution in HypeHype revolves around simple shapes with rounded edges and flat materials, which is a common hyper-casual look in general.
Another art style is Low Poly (Low Polygon) flat-shaded version of the simple shape style. Characters have their own art style categorization.
¶ Asset Basics
Our asset pipeline consists of simple, stylized shapes of geometry. Currently we do not support any texture maps, normal maps.
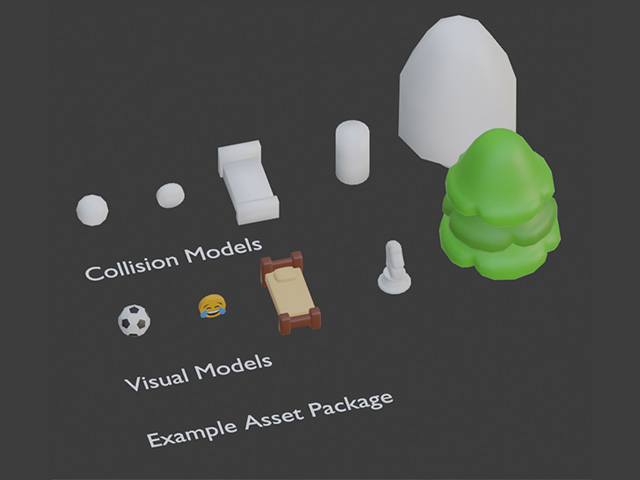
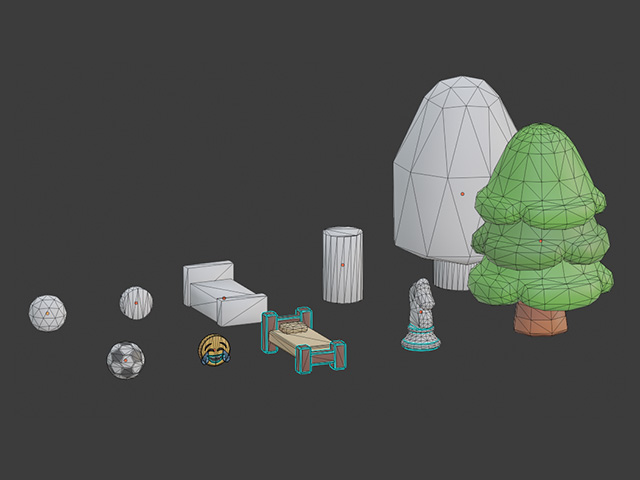
An asset consists of its visual object and one or more collision objects.
All individual assets must be as separate objects. One object can have multiple meshes. Objects must not have any visible backfaces, as they’re not rendered in HypeHype. Additionally, make sure all faces have a proper normal direction.
Polycounts in visual objects need to be naturally manageable, but high enough to keep nice silhouettes and rounded shapes, as creators may want to use them close to the camera. Polycount should depend on the asset’s physical size and estimate of usage amount (as a game scene example, usually there are lots of lower-polycount plants but only a few higher-polycount buildings).
¶ 3D Models Examples
- Football 356 tris
- Blockworld Bed 678 tris
- Big Cute Tree 1190 tris
- Racing Car 1596 tris
¶ Different Looks Examples
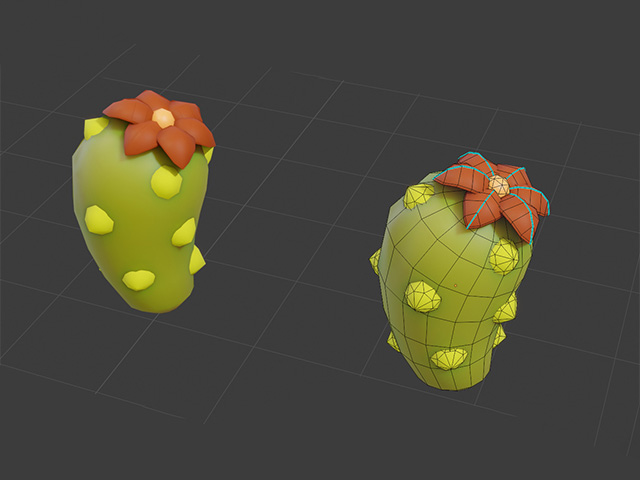
Usually visual objects are fully smooth shaded, but some assets may use a few sharp edges for stylized purposes (double vertices / “Edge Split” modifier in Blender with edges marked for sharpness).
LOD models are not yet currently supported.
¶ Hypepaint
To speed up the process of asset creation, we have an add-on that will handle both UVs and Material/Vertex Coloring of the visual models!
Download the Hypepaint.py Blender add-on
To install it, choose Edit > Preferences > Add-ons > Install.
No need to unzip the file!
Before using, make sure the visual object has 1-4 materials in it, correctly assigned.
To use the add-on, select the visual object and search for Hypepaint (press spacebar to open search). It will assign Vertex Colors based on materials in that order, and generate proper UVs for the visual model(s).
¶ UV Mapping
You can skip this part if you use our Hypepaint add-on.
To set UVs manually, follow the steps below.
As stated earlier, neither diffuse texture maps or normal maps are supported. However, all assets must have proper UV maps.
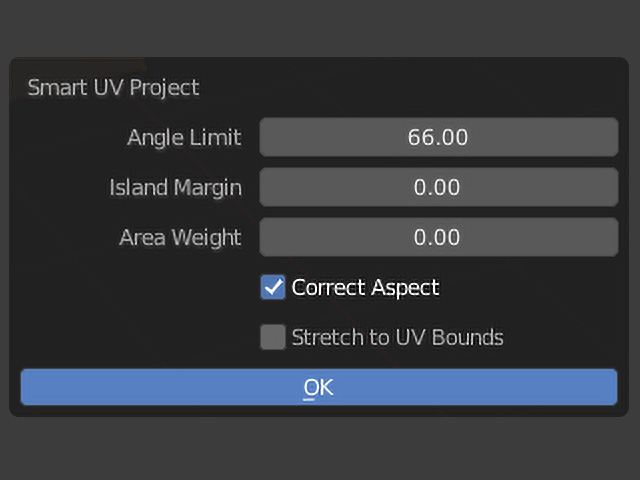
To make UV maps fast for HypeHype, use the “Smart UV Project” tool with a default angle limit, and “Stretch to UV Bounds” disabled.
Make sure that no mesh is hidden before this operation, so that each polygon will have its own UV space.
¶ Material Mapping
All materials are created in HypeHype, and all the information for the material masking is done using vertex colors.
Example: This cactus has 4 different colors and materials planned.
All the faces/vertices that have an unique material are now assigned with vertex color IDs that our engine picks up when the asset is imported.*
When modelling, default Blender material setups can be used for predicting the final result of in-game materials.
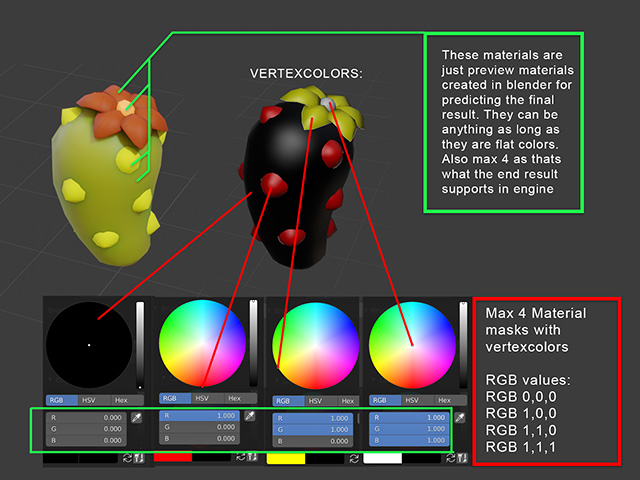
These are usually just flat colors and some nice-looking roughness values added. You can copy materials from the example Blender files we provide. Just change the colors and values to fit whatever you are working on.
We usually have EEVEE preview enabled, which does not show vertex colors by default - switch to Solid shading mode to work with vertex colors.
Our example file can be used as a base for modeling in the correct scale reference, using our preview materials and taking reference from topology, polycount, UVs, collision meshes and naming.
You can skip this part if you use our Hypepaint add-on.
Vertex colors are not used for actual coloring, but instead, assigning ID masks for vertices, so that our engine can assign a material for those vertices in the editor. All the visual materials in Blender are just for initial design and concepting purposes, simulating what the end result could look like in HypeHype.
Currently we support 4 different materials per object. The RGB values for vertex colored masks are RGB 0,0,0 (black), RGB 1,0,0 (red), RGB 1,1,0 (yellow), RGB 1,1,1 (white).
Use the vertex colors in this order with the corresponding RGB values: black, red, yellow and white.
If an asset will have less than 4 colors, make sure to still use this correct order anyway.
¶ Collision Models
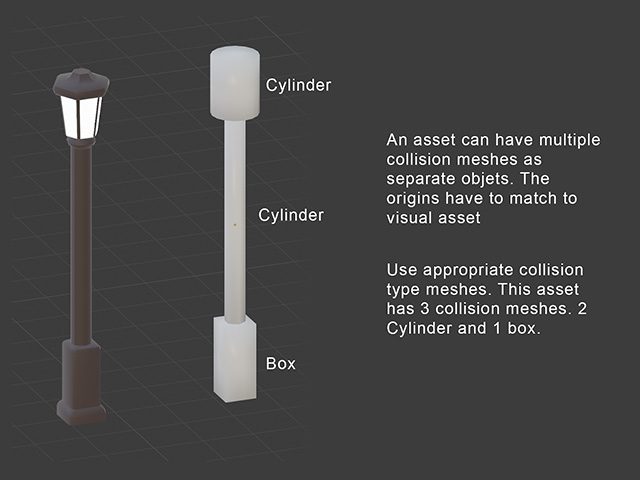
In HypeHype, the engine uses “Collision models” (or “collision mesh objects”) to calculate all physical properties and collisions for the object. All assets must have a collision model specifically fitted for each unique asset. Collision mesh objects do not use materials, vertex colors or UVs.
Collision models usually consist of simple mesh types. These meshes must be as separate objects in Blender.
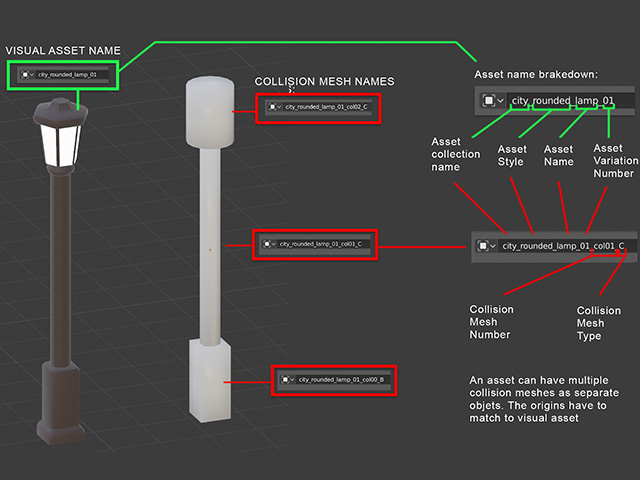
For example, the lamp post asset consists of three collision mesh objects; cylinder, cylinder, box.
Collision mesh is a simplified version of the visual object, sketching out main shapes of the asset.
¶ Collision Meshes
Performance cost means the higher the number, the lighter the asset’s physical calculations will be performance-wise. Try to always use better performing models if possible.
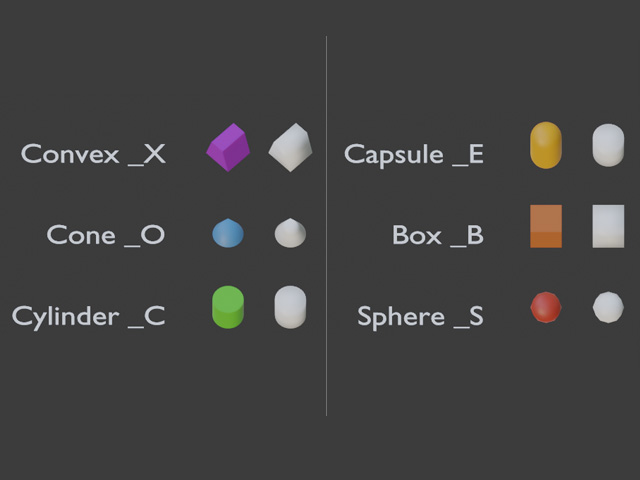
Types of collision meshes:
- S = SPHERE (Performance = 10) (Use Ico Sphere with SubDiv 2)
- B = BOX (Performance = 9)
- E = CAPSULE (Performance = 7) (Use 32 or more edges)
- C = CYLINDER (Performance = 7) (Use 32 or more edges)
- O = CONE (Performance = 7) (Use 32 or more edges)
- X = CONVEX (Performance = 5)
Examples for the collision mesh objects can be found from the example file.
¶ Collision Model Rules
Collision models must absolutely follow these strict rules:
- Box must not have any diagonal edges. Use the convex mesh instead.
- Cylinder must have only straight-edged faces, pointing to either X, Y or Z. No diagonal edges.
- Cylinder can point only to either X, Y or Z direction.
- Do not smoothen, bevel or inset any collision meshes.
- All collision meshes must be convex in shape, even if the type is not X (convex).
¶ Mesh & Origin
Each asset must have an origin point set very specifically. The origin point of an asset is determined by the “center of mass” of its related collision meshes combined.
To figure out what an asset’s origin should be in Blender, use the Object Mode join all of its collision mesh objects (not the visual objects) into one object, then use the “Set Origin” tool with “Origin to Center of Mass (Volume)”. Now you can copy the origin to the visual asset, for example using the 3D Cursor.
Remember to separate the collision mesh objects after this process!
In Blender, visual objects must share the exact same origin points as the collision mesh objects, but they don’t need to be on top of each other. Example in the reference file.
Collision meshes must be smooth shaded with no double vertices / hard edges. They must have proper normal direction, and must not have any holes.
Our engine uses the collision mesh vertices for snapping points in the HypeHype editor. Especially if you’re creating tiling assets, think how the collision mesh snaps with other objects.
Finally, make sure all of the collision mesh objects have their rotations and scales applied.
¶ Asset Naming
¶ Asset Naming
Asset naming is an essential part of the pipeline, as it includes the collision model information and asset category information for the engine. Names for the visual object and collision objects are separate.
Asset names must not have any spaces, instead they use underscores. Also, underscores are reserved for type / category separation, so single asset names with spaces must be discarded.
¶ Asset Naming Examples
Here's some real world naming examples:
“Rubber Duck” -> “rubberduck”
“com_bob64_rubberduck”
Lastly, add a variation index starting with 00. This is especially important if you have assets with variation that still share the asset name.
“com_bob64_rubberduck_00*”* & *“*com_bob64_rubberduck_01”
Collision mesh objects must be named starting with the visual asset name, and following with the collision mesh number “col00”. If you have multiple collision mesh objects, name them incrementally “col00”, “col01”, “col02”. There can be up to 20 collision mesh objects for a single visual asset.
Lastly, add the corresponding collision mesh type from the collision mesh type list above.
”com_bob64_rubberduck_01_col00_B”
Example: a lamp post.
The asset belongs to a category “city_rounded”. The asset name is “lamp”, being of the second variation “01”, thus it is named “city_rounded_lamp_01”.
Its collision meshes are named “..._lamp_01_col00_B” for boxes, “..._lamp_01_col01_C” and “..._lamp_01_col02_C” for cylinders.
¶ Exporting Assets
You are not permitted to use HypeHype assets outside of the HypeHype Platform. Abusing this could rule is against our terms of service and will result in action taken against your account.
Assets are not exported separately, but instead whole asset packages are exported as single FBX files.
To make sure your asset is ready for exporting, follow these steps:
- Apply rotations and scales to both visual and collision objects.
- Select the objects, then select Object > Apply > Rotation & Scale
- Make sure the asset’s visual object’s origin points match collision objects.
- Make sure the assets have no unintended modifiers that may alter the UVs or vertex colors.
- If you have used the Edge Split modifier for sharp edges, don’t apply it to the mesh.
- Use the Triangulate modifier if your mesh has lots of ngons.
- Make sure the asset’s naming is correct and the collision mesh names match with the visual object.
- Make sure the file does not have any extra, unintended-to-be-exported objects
- All your assets and collisions go in the same, one exported file.
- Export in the FBX format with Blender’s default settings. Make sure the “apply modifiers” setting is enabled.
¶ Publishing the asset
Once you’re done, double-check once more that all points above are checked!
To upload and publish your asset, you need to use the desktop version of the HypeHype application.
Navigate Editor Bottom Bar → My Assets → select Upload Asset
¶ Character Asset Checklist
Creating a character model? Follow this Character Asset Checklist
¶ Related Topics
Create Assets in the HypeHype Asset Editor