¶ Download our Example Asset
To help you get started with your custom assets, we've created a sample Blender model for you to download and inspect.
Download the Sample Blender Model
It includes two basic gameplay-fitted sized blank characters, and one full character.
¶ Concepting Checklist
Overall Mobile Style
- Asset will be seen in small scale, it is good to exaggerate key features of the character.
- Make the silhouette recognizable and interesting.
- Focus on the personality of the character.
- Character should be generic / spammable, and easily customizable with colors & extra accessories.
¶ Modeling Checklist
When possible, duplicate an already existing character for the base for modeling. For easier testing, position the character to where the Rigs are positioned.
- Best is to model the character in a t-pose!
- Keep the origin of the object aligned with its rig’s origin.
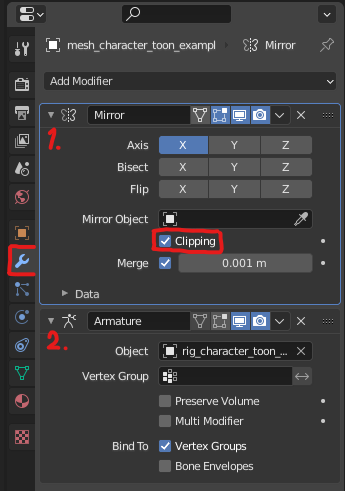
- Use the Mirror modifier until finalizing.
- The Mirror modifier must be before the Armature modifier.
- Enable Mirror modifier's clipping option.
Objects not meant to be mirrored can be separate objects until finalizing (ie. hair).
- Make use of already existing parts and components (ie. eyes, ears, arms)
- Utilize materials already in Blender scene.
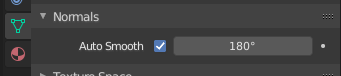
- When using Sharp Edges, set Normals to Auto Smooth at 180 degrees.
- If unavailable, navigate to Geometry Data and click “Clear Custom Split Normals Data”.
Please Note: With Blender 4+ this has been changed into Edge Split modifier.
Polish
- Make sure limbs inside body mesh are “closed”, with a simple bevel.
- Clean up bad topology like n-gons by Triangulating or using the Knife tool.
¶ Rigging
Character assets in HypeHype currently support a maximum of 75 bones.
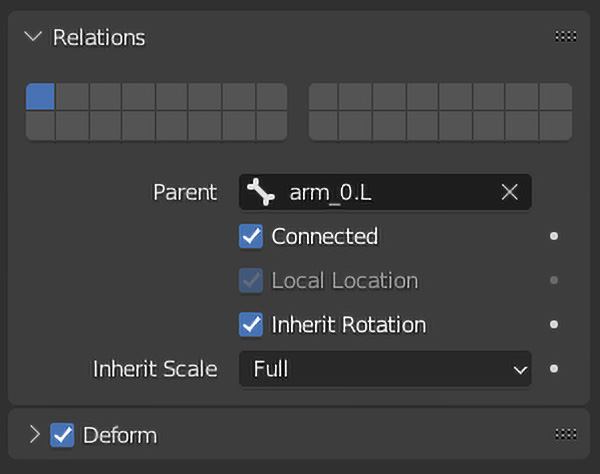
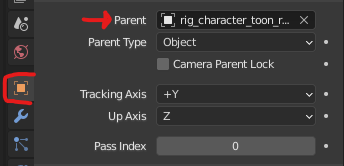
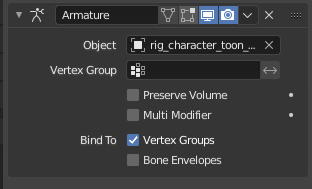
- Check if the object has a Rig (Armature modifier AND parent object set to the Rig).
To parent the object with a Rig. - Select the character object(s), then add one of the Rigs to the selection.
- Run “Parent” with Armature Deform with Empty Groups.
- Rig should match the character’s body type (shoulder and head positions should match).
- Choose one already existing Rig, or if necessary, create a new Rig that matches the special needs of the character (ie. Giraffe’s head position).
- Weight paint the character similarly to other character assets.
- Once done, test moving all movable bones of the Rig and check for bad rigging.
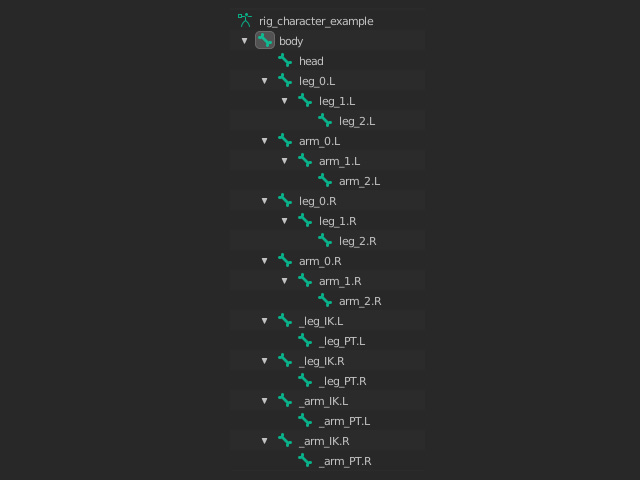
Bone names with underscores are not deform-type, and won’t be exported, therefore are not taken into account when calculating the maximum amount of bones available.
Currently, the maximum number of deform bones in one rig is 60.
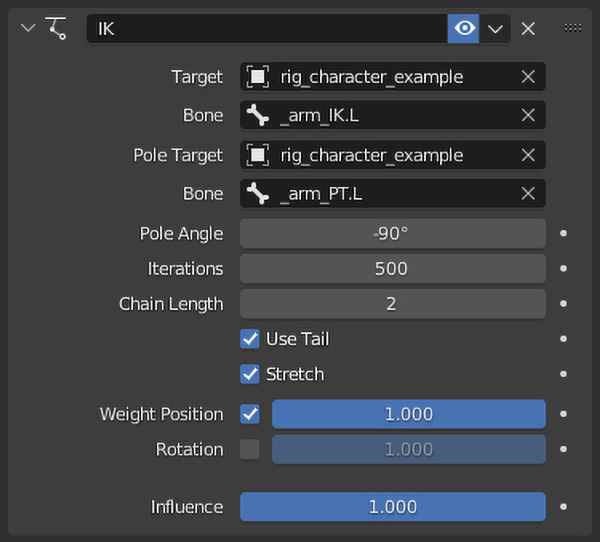
¶ Inverse Kinematics
IK bones stand for Inverse Kinematics, and are configured in bone constraints of bones like arm_1 and leg_1.
PT bones stand for Pole Target, and are used by IK to determine pole direction of “limbs”.
Refer to the example character rig to see how they work!
¶ Technical Limitations
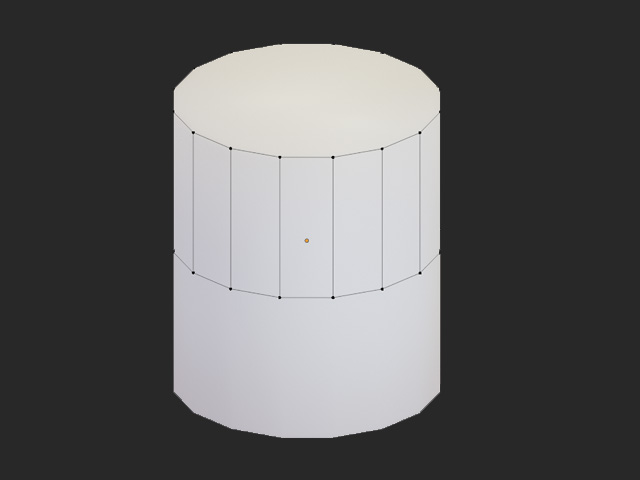
Due to current technical limitations, one vertex can only be assigned to four bones. It can be examined in Vertex editing mode, by choosing one vertex.
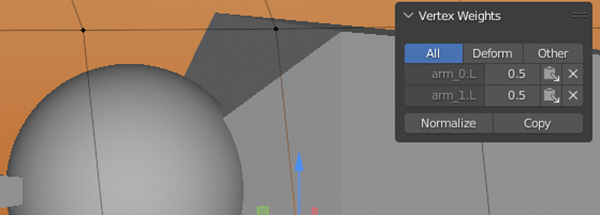
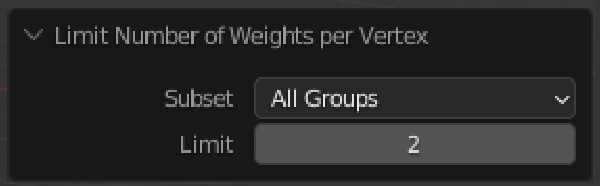
¶ Weights Per Vertex
Quick way to limit this is to choose all of the vertices, and running this command.
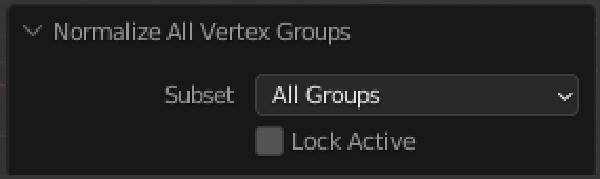
¶ Normalize all Vertices
The weights on each vertex are also limited to a normalized value of 1.0. No vertex should have less or more than 1.0 of total weights.
To normalize all vertices to this limit is to choose all of the vertices, and running the command as per the image.
¶ Animations
Animations are considered their own assets in HypeHype, as they can be used by any rigged model. It usually is good to create animations for the default character type.
Animations are made as Actions. Be sure to mark Fake Users to each Action that you want to save, and name them how users should see them. “Soccer Kick” for example.
Animation keys utilize Position and Rotation, but not yet Scale. Best is to key all deform bones to start and end of the Action. Both start and end keys should be identical for smoother transition, but HypeHype will interpolate animation switching either way.
For better quality, enable cyclic animation setting, and make sure interpolation is smooth (linear, bezier etc). Animation FPS should be 30 in Blender.
Range for an animation usually should be between 5 and 50, but longer animations are supported too.
¶ Character Collisions
Character assets collisions are usually Capsules. Capsule collision is generated in the engine, and uses the normal capsule collision for it. It is important to match the pivot of the character model and rig with the collision’s pivot.
¶ Capsule Collisions
Capsule collisions should be made using cylinders, because the engine generates a sphere on top of it, to create a full capsule collision to be used by physics. When making a capsule collision, make a cylinder that is mirrored to the bottom.
The image displays the red areas are generated, and white is actual mesh. Utilize this knowledge to determine the height and width of the collision to match the character!

¶ Materials and Textures
You can color the character model in two ways: via material mapping, or using a custom texture. With material mapping, the model needs to be colored using the material mapping method explained in Asset Creation instructions. Only 4 materials are supported, so it is recommended to remove unused materials from the model in Blender before using the HypePaint plugin.
If you want to use custom textures instead, make sure that the model has a maximum of 1 vertex color in use, and that it is correctly unwrapped. HypePaint is not recommended, because it overrides both properties. For detailed steps, follow the Textures instructions.
¶ Finalizing Checklist
- Make a collision object for the character with a matching name
- Make sure the model has material mapping or textures
- Apply the Mirror modifier, then..
- Merge possible separate objects into the main character object
- In Object mode, Run the Hypepaint add-on
- In Edit mode, select all of the mesh and run…
- “Limit Total” aka Limit Number of Weights per Vertex with “Limit: 4”
- Normalize All Vertex Groups (disable "Lock Active")
¶ Related Topics
Make a Playable Character Importing your own Assets Asset Editor