¶ Introduction
In HypeHype, connecting logic nodes with links is how you build logic that powers your game. In order to make something happen, the logic must also be executed.
¶ Links Connect Nodes
To connect two nodes, drag a link from an Output to an Input — or vice versa — as shown in the video. Nodes can have multiple inputs and outputs, and links can be created either directly from the node or through the Details panel when the node is selected.
¶ What Can You Do with Links?
¶ Execute a Node
The simplest thing to do with a link is executing a node. Nodes that perform an action won't work otherwise.
Example: Link a Button node's On Start output to an Explosive Force node's Execute input. Pressing the button executes the Explosive Force
¶ Set a Value and Execute
Outgoing links can can execute other nodes even if they aren't connected to the Execute input. You can both set a value and execute a node with the same link.
Example: A Mover node has a cube as the target. Link a Button's On Start output to the Mover's Vector X input. Change the value that is passed to 1. Every button press moves the cube 1 unit on the x axis.
¶ Add, Subtract, Divide or Multiply
Outgoing links can often perform simple math operations. Choose an operation and set the value in the link dialog.
Example: Continuing from the previous example, link a Button's On Start output to the Mover's Duration input. Change the operation to Add, and the value to 0.5. Turn off Also execute - only one executing link is needed. Every button press moves the cube and increases the move duration by 0.5 seconds.
¶ Learn More about Inputs
Inputs are the values that go into a node, while Outputs are the signals and values that come out of a node. Input values can always be set with links from other nodes, but often they are set manually in the Details panel.

There are different types of inputs:
- Execute: Nodes that perform an action must be executed to run. Many nodes have a dedicated execution input. For example, a Spawner spawns an object, or a Force node applies force to a target when executed.
Note: Execution links (red) can also connect to value or target inputs. This is useful when you want to both send a value and trigger the node in one step. - Toggle (On/Off): Some inputs switch a parameter on or off. Most nodes can be disabled via a link, and others — like Text Display or Button — can be hidden this way.
- Option Selectors: These inputs offer predefined choices. For example, you can:
- Select the effect emitted by a Particle Effect node
- Choose the animation in a Character Animation node
- Set text for a Text Display node
- Value Inputs: Crucial for game logic, these inputs can take for example numbers, or vectors (e.g. position, rotation). Depending on the node, different data types can be passed — including object references, text, and more.
- Target Inputs: These define the object a node interacts with. For example, a Spawner needs a target object to spawn, and Look At node requires two targets: the object that is looked at, and the object that turns to look. In some cases the target may be another node (e.g. List Value Inspector, Spline Sampler)
- Custom Inputs/Outputs: Some nodes let you add or remove inputs and outputs. For instance:
- Switch allows multiple cases.
- Formula lets you define which variables it receives.
¶ Link Types
There are three types of logic links in HypeHype: Push links, Reader links, and Target links.
¶ Push links
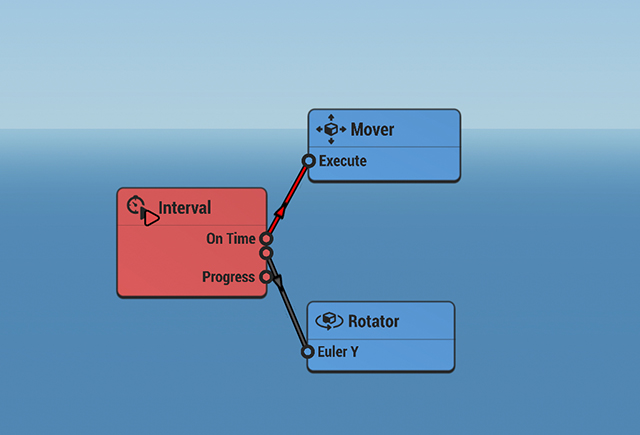
As the name suggests, push links are used to push values. They can also trigger the execution of the next node in the logic flow. Red links indicate that they also execute the connected node, while gray links do not.
In the example image below, the Interval node is executed On Start, which is shown by the red triangle in the top-left corner of the node.
When the Interval node is executed:
-
It pushes a value to the Mover node, which is also executed.
-
It pushes a value to the Rotator node, but the Rotator is not executed.
Red and gray links only activate when the source node is executed.
¶ What Values Will Be Pushed?
You have several options to control the data that a link carries. In the simplest case, an outgoing link only executes the next node, and link values don't really matter. A common case would be a button press: it typically just initiates the next action. But links can do more.
Depending on the output, these are your options:
- Only execute the next node
- Pass the output value as it is (optionally execute). Example: Joystick node outputs the movement amount on X and Y axis to the Mover node
- Perform a math operation using the output value (optionally execute). Example:
- Set a value or perform a math operation regardless of the node's output value (optionally execute)
¶ Linking Order
Link order is important when pushing values. Output links are activated in order, from top to bottom, when the node is executed.
Link order can be adjusted, so the links are executed in correct order. To do this, tap the three dots next to the Output. A new window will open with all the Output links, which can be dragged up and down the list by tapping and holding the two lines on the right side.
One of the most common issues is that links are not in the correct order. If your logic doesn't work as expected, it's a good idea to check the link order.
¶ Reader links
Unlike Push links, Reader links don't execute the Outputs in the node they are connected to. Instead, they work backwards from the executed node, reading the value from the linked output where needed.
Reader links are colored by type:
| Color | Type |
|---|---|
| Orange | Vector |
| Yellow | Number |
| Purple | Rotation |
| Blue | Object |

¶ Target links
Target links are green and they are used to set targets for various nodes. Being a target for a node means that the action this node executes will be performed by the target, for example.
In this sense, you can set the HypeHype cube to be the target of a Force node.
- Open Start from Scratch from the Create Page.
- Add the Force node from the Logic tab in the Bottom Toolbar.
- Drag a link from Force - Target to the cube.
- Set Execute - On Start on the Force node.
- Playtest and watch the cube jump once!
connectingnodes_targetlink.mp4
¶ Related Topics
Triggering Events Timing Events Reading Values